Principles for Success in Engagement Photography

I have had a lot of engagement shoots in the past few weeks and I got to thinking about some things that to me were obvious markers for success, as well as some things I learned along my journey. I have shared some suggestions below to ensure you have a fluid session and leave your clients wowed.

Arrive Early & Stay Late When you are late to your own scheduled photoshoot that says a lot. Your client may think, “Will he/she also be late for our wedding?” This gesture may send the message to your clients that you may be irresponsible or disinterested in their needs. Instead, you should send the message to your clients that they are your number one priority by showing up not only on time, but staying late as well.

Backup Equipment I currently shoot with one body and 2-3 lenses. But I always keep a backup set of equipment in my trunk or at the venue in case something malfunctions. If you find your camera malfunctions during a shoot and you were unprepared with a backup, maybe it was you who malfunctioned. But really...be prepared for anything.

Have a Rain Date When I schedule my Engagement Sessions I create a backup date right away. It is easier than having to go through the whole process of finding out when everyone is available all over again. The weather can be unpredictable but you do not have to be. Afterall, you cannot have a rain date for the wedding so you might as well take control of what you can.

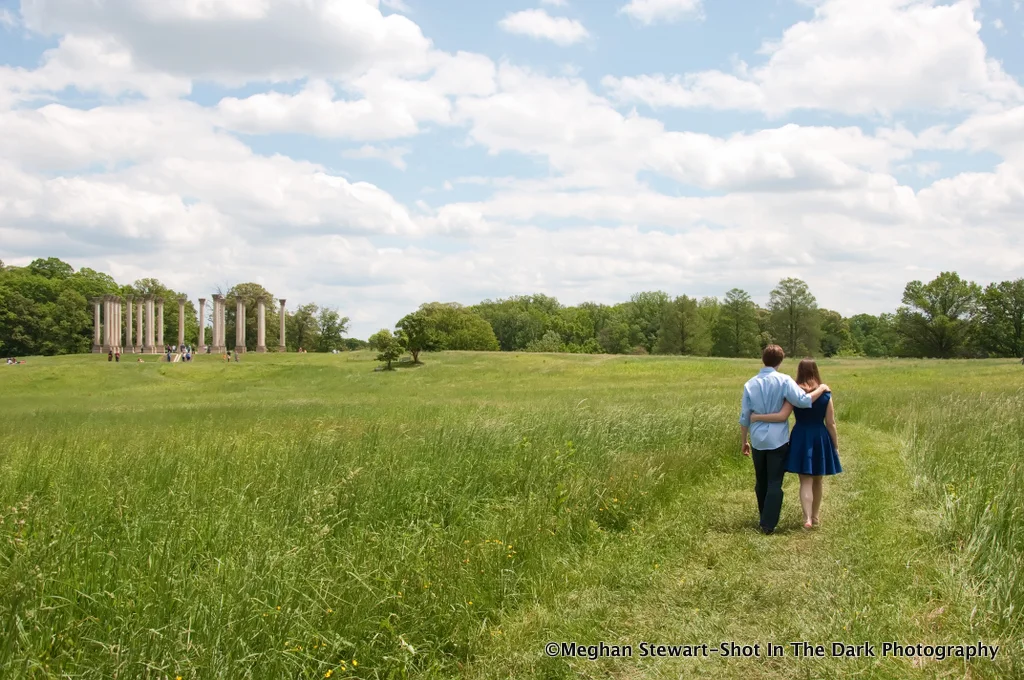
Research the Lighting I always try to go to a new location with my camera first before the actual session. I also pay attention to the sun during my research shoot and if possible, time it around the same time of my upcoming scheduled portrait session. This way I can test for the lighting. You never want to take someone to this really cool spot you found the week before only to find that the shot you had imagined is now unable to be captured due to a change in the light.

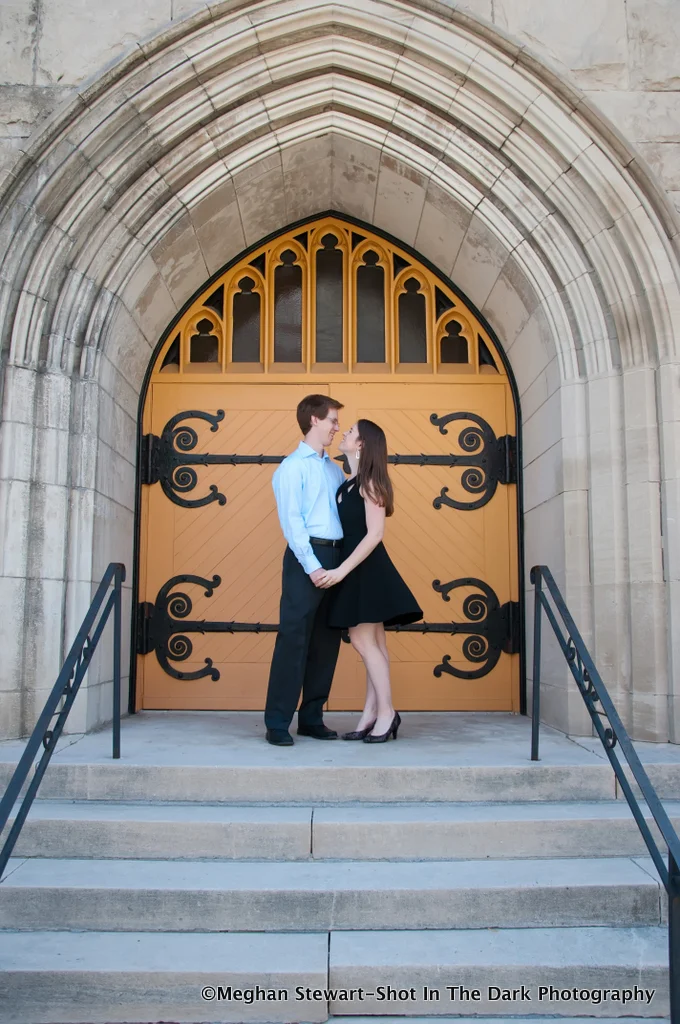
Location, Location, Location Don’t be afraid to try a new spot, if anything, it will diversify your portfolio, get you out of a rut and may teach you something new. Some of my best photographs were taken on a whim. I often will walk by a side street downtown and think, what a great place for photos or what a cool backdrop. So return with your subjects and make that great spot a reality.

Meet Sediment Press

Sediment Press is an illustration and screen printing company. They create pieces mainly in the form of posters and cards, including wedding invitations, business cards, and postcards.

When I entered Tim’s apartment I was greeted by Epson the cat curled up lazily in front of a screen printing nearly six feet tall. It was of a strangely human-like dinosaur skeleton staring into a futuristic star it held in it’s hand. Epson seemed like a conquering general lying at the base of a statue among the ruins of his overthrown city. The image, though on a flat surface, developed a 3D quality from multiple screen printings.Once in the studio which is a closet-sized room creatively set up with lights, a press, a drying rack and more paint that I have ever seen, I asked Charles how Sediment Press came to be. He explained that he and Tim had first met in a screen printing class at the Art League in Alexandria. After the class had ended they decided to set up their own shop in Tim’s apartment and continue to print on their own time.A little press from Charles and Tim...
 
How Sediment Press got its Name
We settled on the name Sediment Press because the name seemed an apt metaphor for screen printing. Screen prints are built up by layers of ink much in the way that layers of sediment accumulate over time. I also have a thing for dinosaurs and wanted a dinosaur skull in the logo.

Screen Printing 101
Tim and Charles invited me to watch the screen printing process and they explained how screen printing is done from start to finish.
1) Most pieces begin with a series of sketches
2) Then the piece is illustrated either by hand or on the computer
3) The design then is separated into different layers of color that are needed for screen printing
4) The layers are printed separately onto transparent sheets
5) The designs on the transparent sheets are burned into the screens using a photographic process
6) The water soluble stencil is rinsed out of the screen
7)  We then print the screens one color at a time resulting in a multicolored image
 

The Medium of Screen Printing
Screen printing is an extremely versatile process. One of the reasons we chose it as a medium is that it allows you to source images from anywhere. Hand drawn art, photographs, computer generated imagery, and even found objects can be combined into one cohesive piece. Because you can produce so many at one time you can to create hand crafted art pieces that are affordable to the average person.  We also like how the process is scalable. We started making posters and cards but have gone on to print pieces taller than us.After Tim and Charles showed me the printing process they let me see a sample of their work that they had created for clients. I was intrigued by the versatility of the artwork and left feeling inspired.
Want to see the finished product? Or if you have an inquiry please reach out to Tim and Charles below.
 
Sediment Press
Charles Robertson - Creative - 504-330-0556 - charles@sedimentpress.com
Tim Lovelace - Operations - 571-291-5813 - tim@sedimentpress.com
General Inquires - contact@sedimentpress.com
sedimentpress.com
 
Sediment Press walks a line between a contemporary art studio and a commercial illustration company. We are highly experimental, always looking for new ways to make compelling images and to convey ideas. One way we have tried to set ourselves apart is by attempting to master both the creative and technical aspects of screen printing.  Charles has a lifelong background in art ranging from large scale metal sculpture to traditional drawing and painting. Tim has a degree in graphic communications which focused on modern printing techniques and methods of production.
 
This article was written by Meghan Stewart, Tim Lovelace and Charles Robertson. If you would like your business featured please contact Meghan Stewart.
 

Janice's Banana Nut Muffins

I will begin with telling you that these are the best muffins ever!

I grew up on this recipe as a kid. I would eat them fresh out of the oven warm and gooey with butter and a cool glass of milk. Snowy days of sledding and soggy snow pants coming in to sit by the wood stove. And rainy days filled with crafts, glue still sticky on our fingers. Even sunny Summer days when we would build forts and play in the pond until mud speckled our faces and clung to our clothes-- these muffins would be waiting for us.The recipe is that of one of my closest friends moms who has always been like a mom to me. She is a lovely woman and an incredible cook. She quilts the most beautiful memory pillows and personal hot pads and even made me the some hot pads (featured in the attached photo) when I moved out of my parents house.
 
I make these muffins a lot, and much to my husbands dismay am forever storing away overly ripe bananas in the freezer.
This time around I omitted the nuts and added quinoa and gluten free flour. If using quinoa you will want to cook it first. I used 1 ½ c. flour and ½ cup quinoa. I cooked the quinoa in the microwave one part quinoa to two parts water. You could also cook it on the stove.
 
First cream together:
1 stick butter or margarine
1 c. sugar
Add and blend together:
2 eggs
4 ripe bananas

Combine and then add to above:
2 c. flour (option to add quinoa here)
½ tsp. salt
½ tsp. baking powder
½ tsp. baking soda

Add:
½-¾ c. coconut and or ½ c. chopped walnuts or pecans.
Spoon into muffin pan ⅔ full (a little more full if using gluten free flour)
Bake at 350° for 30 minutes. (Around 25 for gluten-free flour)
Makes 14-16 muffins.

If making bread, pour batter into (2) 9”x5” loaf pans. Cook at 350° for 50-60 minutes.
 As you can see Sam approves of the muffins. Every time I make these,  I am taken back to that old house on the dirt rode with the pond and the winding creek. And the women that first shared these delicious muffins with a little girl still reeling from the chill.